Richard98
MYA Member
-
Joined
-
Last visited
Everything posted by Richard98
-
Hi Shaun, Loads of work for a one off! I like composites also it is just that cedar planking a hull only takes 2 or 3 days and is really simple. Also possibly more accurate unless used to foam shaping and avoiding the usual pitfalls. One piece wrap works; assuming you will be using fine twill weave and epoxy. Still you will be surprised at the weight to add with the fairing filler at 30-40grm per coat. Don't forget to colour pigment the coats ! I use U pol, by the way. Add some pics as you go. Richard
-
Hello Howard. I am not a scale modeller but I do know that the approach needs to be different. Weight and strength makes it much more of an engineering task. For this reason I make all the planks full length with no "closing" planks just my way, but it means that each tensioned plank contributes to the stiffness. This will result in an odd looking plank line and not like a model. I use cedar planks; 10 X 3mm. I precut only 3 different shaped planks with a parallel in the centre tapering to the ends with the parallel part reducing in each of the batches of 3. I have one of those little razor planes and it is perfect for tapering the planks a pair at a time. Each plank only requires edge sanding to fit snugly to its neighbour. I usually do the layup 3 planks at a time on each side, leave for a few hours and do the next 3. Really quick and I find the hull the quickest part of making a One Metre. Cedar versus Balsa ! I don't want to start a debate, since each builder has a preference. I prefer Cedar. It is much more tolerant to being pulled down hard whereas you cannot do this with balsa because it bends too easily and it difficult to avoid dips between the frames and you cannot tension balsa at all. It is the tension locked up in the tortured cedar planks that results in considerable strength. The bare hull shell should "ring" like a violin. Glue is important here and you need a quick grab aliphatic resin. It is vital that any excess glue is wiped off immediately, it swiftly adds to unnecessary weight. I use Deluxe Aliphatic resin; available from model shops. Also about ten rolls of 10mm insulation tape. Balsa also hoovers up resin when coated. I coat the whole shell with SP106, light and very strong epoxy. The same I use for filleting and all bonding. Although I do not always glass a hull, I did line the inside of Alternative because it is quite a tight shape. Only the inside though and I use very fine woven glass: about 50gsm. That is what I do, Howard. I am sure that you will get a different approach from whoever you ask though. Each just as good for them. Building a modern boat like Alternative is a huge saving on a purchased hull and I can assure you that this design, carefully built will see you at the front of the fleet. Richard
-
Built my latest Trimaran back in May, but only sailed it properly for the first time last week . I know these boats are outside the normal MYA scope, but they always seen to generate interest when they appear on the water. I built this "Artelio" design (thanks Jean-Marie Clech for the plan) primarily to try out different foil and rudder configurations and it is not really a practical sailing boat like my last Mini40 Trimaran (Sold that one a while ago) As usual weight is critical and this weighs in at 1.15 Kg all up and ready to sail, is 1250mm long with a Marblehead B swing rig, set up as conventional. Very quick to build with the main hull being little more than a box made from frameless 1.5mm ply. CF would not be any lighter in this instance. If you have never experienced foiling then you don't know what you are missing. One moment just poodling along and then it sort of takes off and is across the lake. Too quick to even give much thought to direction. Instantly "hooked" and I spent the next two hours hurtling back and forth. Not proper sailing I know; a conventional tri or cat is the next build, but as an intro to really fast sailing takes some beating. Richard

-
Just did a quick Google search for parcel to Canada. Cheapest I found was £50. Insurance would increase this. Note, it helps if the ballast can be removed from the fin; easier to pack and makes parcel narrower. Don't forget that the sender will spend time and effort and some expense in boxing up and packaging. Have a look at some suppliers to see what they charge, most of them export all over. Richard
-
Hi Tom, Have shipped overseas from the UK to Australia, New Zealand & USA, last boat was a Marblehead to Croatia. No real problem really. Need to make up a good box and ensure the ballast is very well secured. Overall weight and size is within normal carrier ranges BUT: the mast makes things difficult if shipping a rig as well. Still not cheap if fully insured though, but easy to get current prices from such as Parcelforce to name but one. On the occasions I shipped a complete boat, it was without a mast. Easy to source locally anyway. Richard
-
Trevor, Don't like the sound of the ball and dimples in the tube. Might be easier to start from scratch with a new piece of tube and pin. Ikon drawing shows what is needed, including the nylon fitting at the top. I think Sails etc now use a slightly larger dia tube and nylon fitting than that shown on the drawing. I seem to remember that from recently building my Alternative, but cannot access it to measure. Worth checking since it makes fitting the line easier. Adjustment is not possible since it is important to have the ring at the top as close as possible to the deck. This is very important, especially to take advantage of the low mast position of Isis. Richard
-
Trevor, Could not find it either. However, have a look at the Ikon drawing located in Sails etc downloadable documents to see details of the tube fixing and the arrangement of the line. Use D50 dyneema for the line and pass down from the top, each side of the pin. Make the knot outside the hull, I use a bowline, approx 10mm loop. Then hook the long piece of line back up the tube using a piece of rigging wire. Easy and quickly done. Do not forget to seal knots in dyneema with superglue. The knots will come undone otherwise. Ensure no glue gets on the pin or on the tube, future replacement will be difficult otherwise. This is an excellent jib boom swivel for the No1 rig and works in the lightest of breezes, also transfers the load to the hull so no deck displacement to slacken the forestay. A fillet web or recessed deck moulding transfers the deck stiffening to the other rig eyebolts in addition. Richard
-
Hi Trevor, If this is an aluminium tube that exits the bottom of the hull and also the deck; then the following should help. With the tube removed completely, roughen the inside of hull and underside of the deck to prepare for adhesion. Similarly roughen the tube for approx 10mm each end. Note: the tube should have a little rod through it just above where it enters the hull. This is to secure the line that runs up the tube for the jib boom pivot. Tack the tube into position with 5 minute epoxy - just a dab. Mask around the area to be fixed. Electrical tape is best, not masking tape. Stick a piece of electrical tape over the hull exit. When the tack has set, mix some decent epoxy and dap a very little around the hull exit hole from the inside ( a cocktail stick is the ideal tool) The tape will allow the epoxy to flow the space between the tube and the hull - only a drop or two though. Then thicken the epoxy with colloidal silica or similar, to a "mayonaise" consistency and form neat fillets around the tube, top and bottom. The tape will prevent excess eopxy and make a neat job. Remember it does not need a lot, 10mm up/down the tube and added to the tube radius is more than sufficient. When the epoxy is nearly set, it may be gently formed to neaten and the tape removed. Epoxy and fillers are readily available in small quantities from model shops on line. To refit the line down the tube have a look at the Sails etc web site, where a decent description of the simple process may be found. Let us know how you get on. Richard
-
Thanks again Mike, that will work. Just going to look for a suitable (cheap) boat. Point noted about avoiding prop foul. Swordsman was a beautiful (full size) hull, from Fairey Marine if I remember. Richard
-
Hi Michael, Although not familiar with the Krcar, Peter Wiles is usually found at the top end of competition and his other designs are still very useful performers so I can see no reason why this design should not "be suitable for your lake" £300 is not a huge budget so, in my opinion, good quality sails and mast in good condition with decent foils (fin and rudder), possibly together with a modern ballast are the most important considerations. These will contribute more than anything to performance, far more then the hull. So if your boat ticks some , or all of these boxes then go for it. With the above; most modern hulls and the Krcar is such, are quite capable of good competitive sailing. Let the forum know what you decide, Michael. Richard
-
Thanks Mike, that makes a lot of sense. I assume that the casualty can not be too far away for this though. Any sort of motor boat would do the job ? Richard
-
Currently building my second Mini40 trimaran and recall from frequent experiences, these things capsize. I know the use of radio control rescue boats is not unusual. Any ideas on best type of (cheap) boat and the proven way to equip for rescuing boats in trouble. Including IOMs etc and not just multihulls. Richard
-
Alternative going like a train, but since re-rigging with those nice BG sails and a Pierre Gonnet mast just could not seem to get the best sail shape on all points. I had used a high tech roller setup to achieve an accurate pre-bend and it matched recommendations, but just did not feel right. Bit the bullet and took the sail off and decided to revert to the low tech bend method, as suggested aeons ago by a sailor who subsequently won the Worlds. To quote the instructions: " Just bend it around your middle". Now, of course, the gooseneck is fitted and the shrouds. I recently fixed the mast crane to avoid rotation and between this and the gooseneck body, maintaining the bend axis is very easy. So yes; rig and drill the mast before bending this way. First I removed the existing bend, then proceeded to gently bend to match the reversed luff shape. Simple. Refitted sail and it looked good, as they say. Proof of the pudding was sailing this morning. Simply fantastic ! Previously I was aware that performance fell off noticeably depending on initial set up. Either upwind or reaching. Boat pointed brilliantly and now accelerated downwind also. The excellent sails can now do their job. Just down to me now, thanks to that "gut feeling" and some old but good advice. Richard
-
Hello Frayz, pleased to hear you are enjoying radio sailing. Not as glamorous as yours, but I did at least select the cedar strips to give some contrast. My Alternative design by Brad Gibson. Richard

-
Shame you have been advised against multihulls. I built a Mini40 trimaran and most of the fun is in the solo sailing and experimenting with these amazing boats. I returned to "main stream" One Metre (IOM) sailing and sold my trimaran, but I do miss the buzz of sailing it and the constant design tweaking and simply messing about trying out new ideas. Ironically this used to be a significant part of IOM sailing too. I am going to give it another go as there seems to be a little more info out there now, especially on the magic of getting these boats foiling. Have a look on U tube at the exploits of Ian Holt who is Perthmini40man and from whom a lot of the magic may be learnt. Richard
-
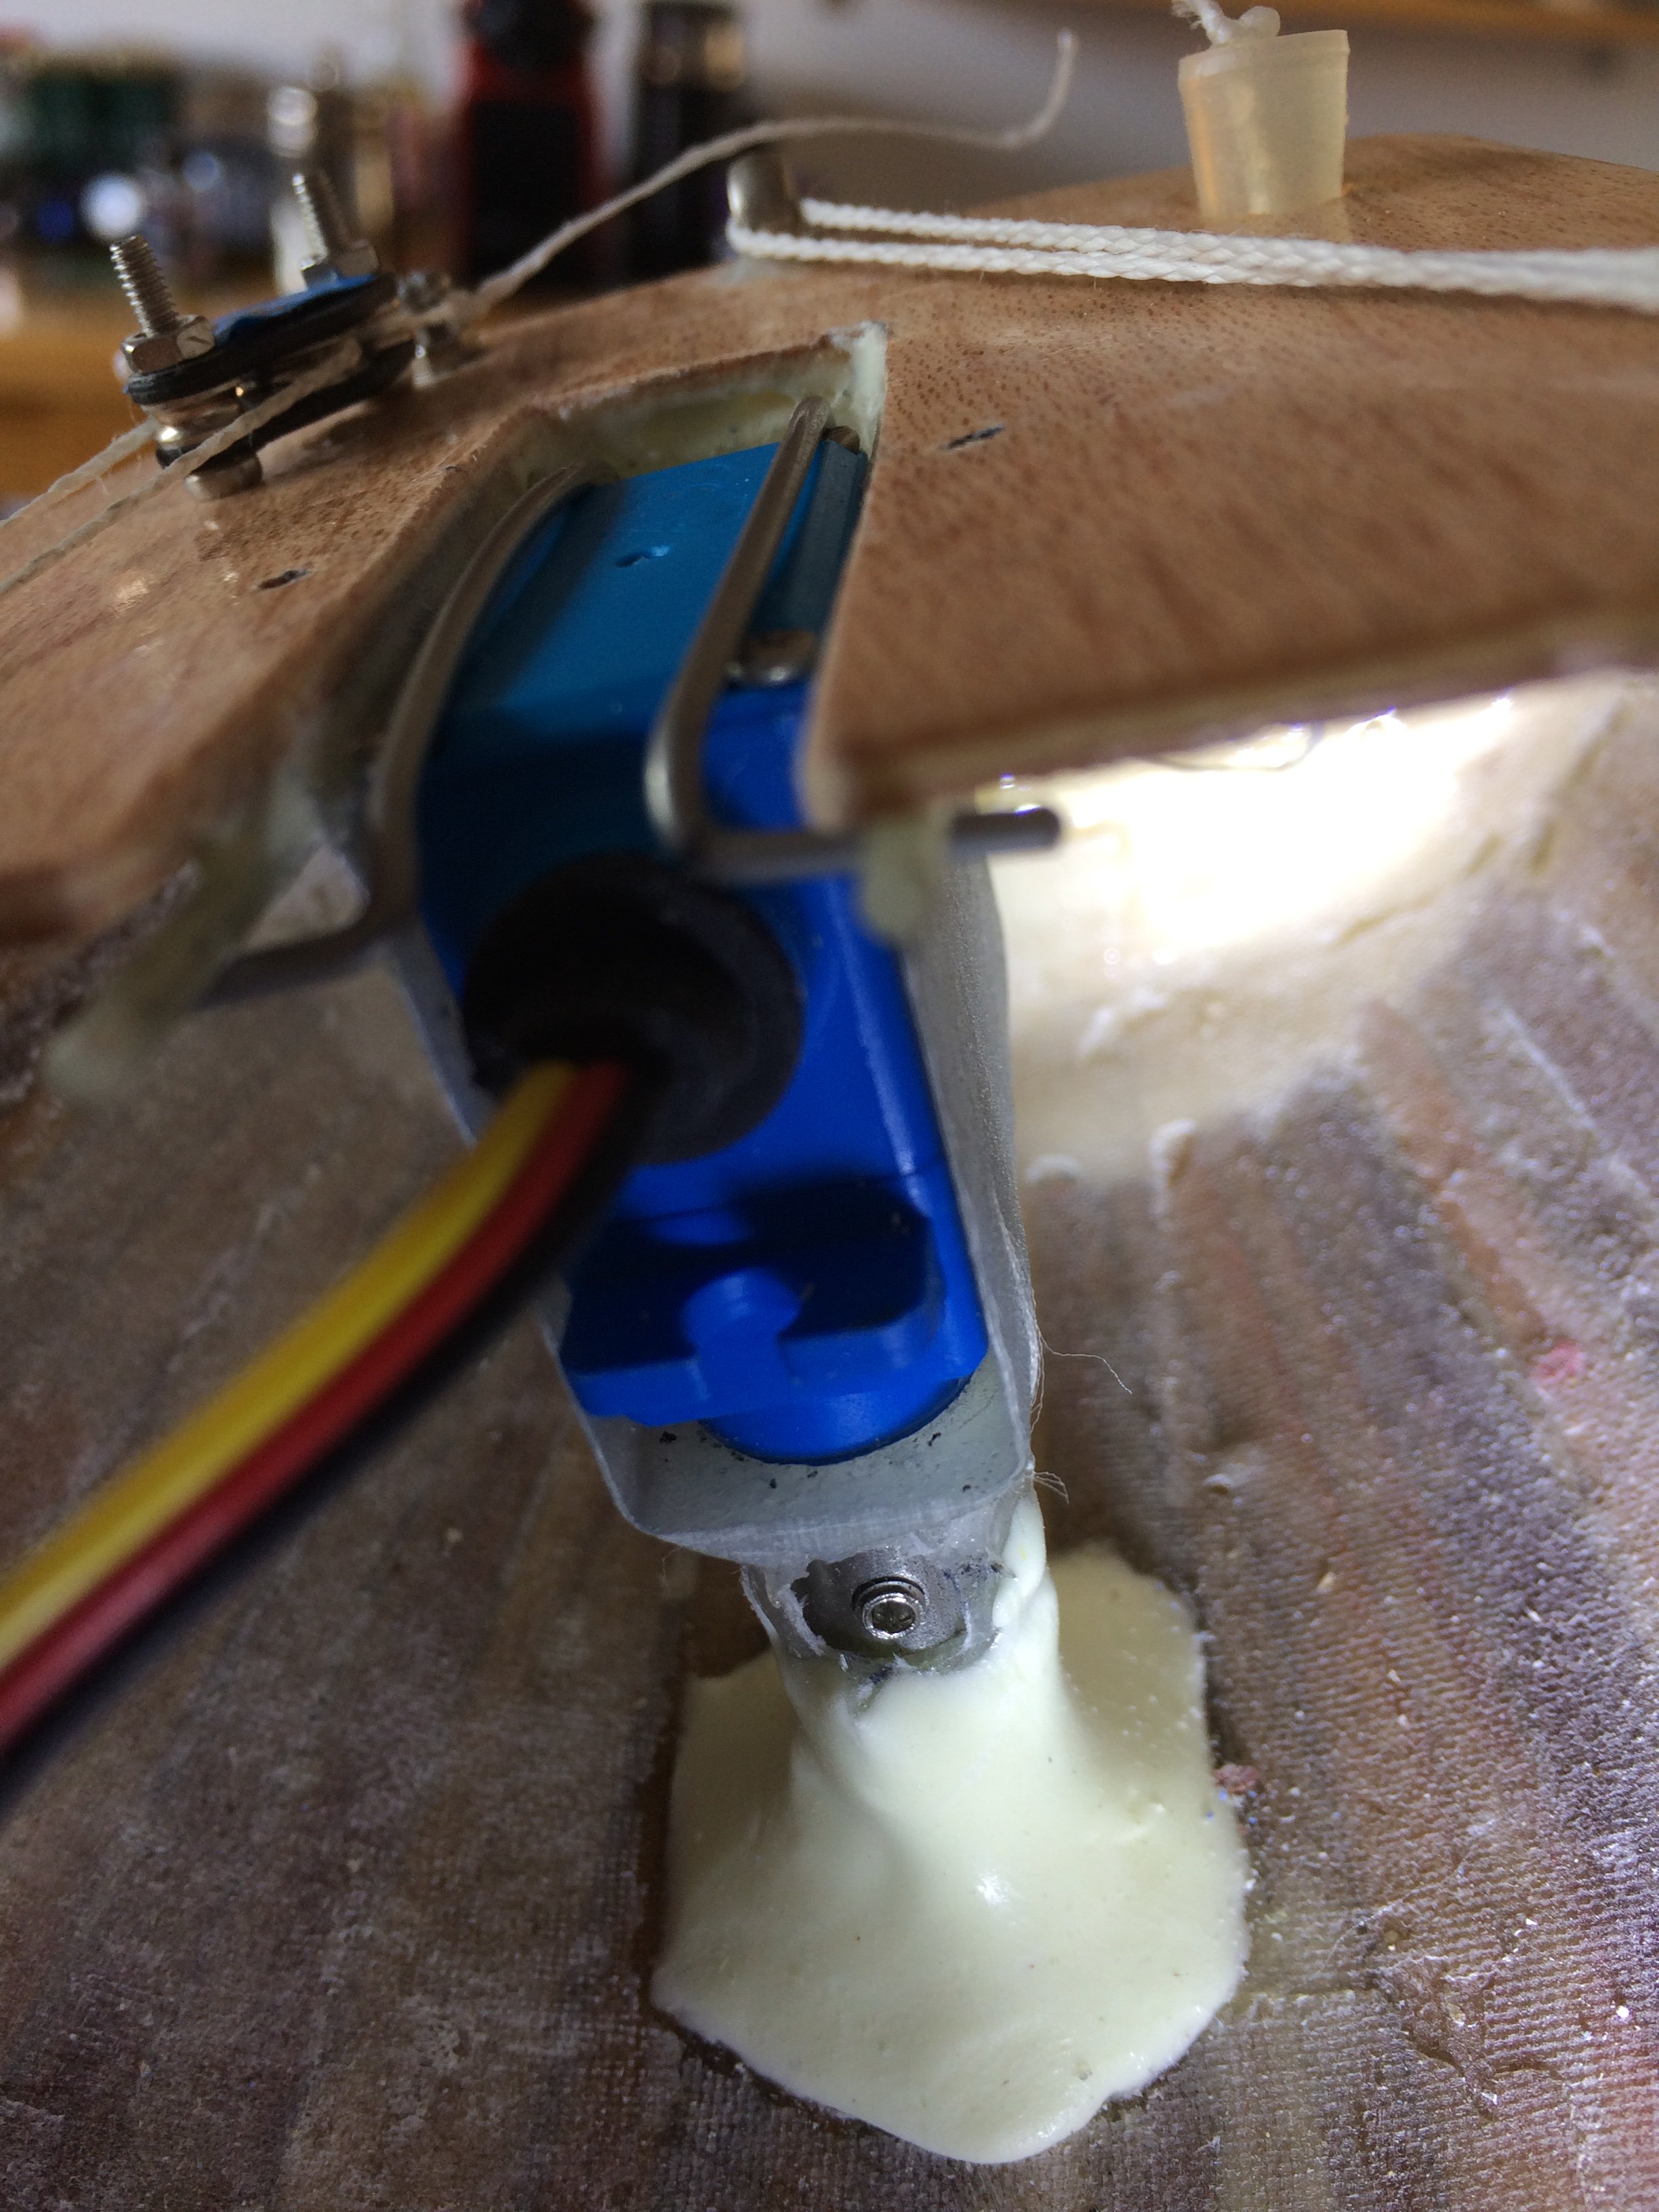
Result of rudder servo modification. Boat felt much tighter and the benefit of using exponential settings on the rudder control is now full realised. Easy to dismiss as a placebo effect the cynical may say. After all how can merely repositioning the rudder servo have a noticeable effect ? Well it does: the complete absence of any play, combined with the expo setting is, most definitely tangible. An additional bonus, particularly on the start, is the ability to increase the braking effect of the rudder. Greater angle is available compared to a linkage. Just try to avoid using it while sailing of course. A lovely little moulding from Dave with obvious attention to detail. For example; the servo retaining arrangement and the rudder shaft adaptor. What next ?
-
Been sailing Alternative for a while now, really pleased with performance. Decided to ditch central rudder servo and linkage and install Dave Creeds neat little aft mounted servo moulding. Easy bit of surgery and the rudder is now rock solid, with extreme rotation available for braking ! Had to sort out aft sheet turning block, since the bolts fouled the servo moulding flange. David Potters little pulley mounting bracket solved the problem with the added bonus of easy dismounting of sheet drive lines. It may go against common sense to place weight at the ends, but the little Hitec servo only weighs 28 grams. The overall weight reduction was nearly 40 grams. Yes I will add extra corrector weight. Richard


-
Second picture here. Cannot download more than one at a time. Preview shows both but after submitting one is deleted.

-
Last pics for anyone still interested. All trimmed now and epoxy final finish applied; plus "ALTERNATIVE" logo from Brad. Richard

-
Tried to attach second picture, unsuccessfully. So here it is. Richard
-
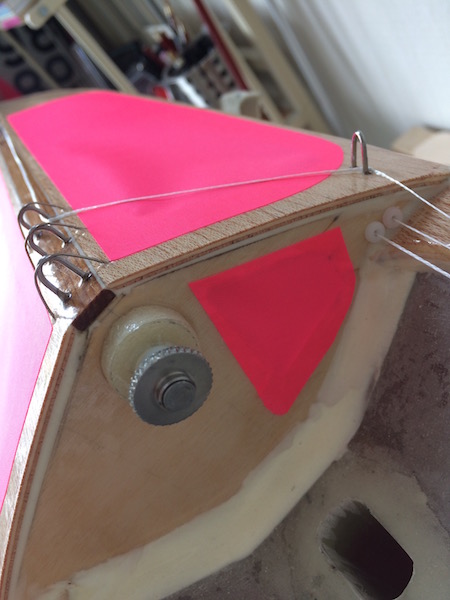
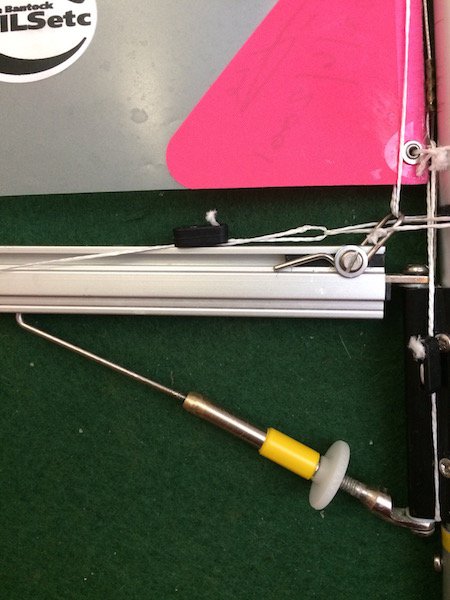
Hi Roger, As long as the finbox and mast are all 5mm further forward the balance should be similar; the rectangular rudder reduces the effect of the hull rocker on the lateral position so the main effect will be to change the trim a little. But do note that Brad has placed these components deliberately and not where I would have expected; which is what has made this build particularly interesting. I went for the simple ram and accept that there is no lateral support. I have tried extending the deck on other designs to form mast partners but the horrific snags on lines were not worth the bother. The kicker problem: easily solved. I re positioned the fairleads as shown on the picture and filed off the Sails etc knurled top (using a drill and file) The lower plastic locking wheel just clears the fin bolt. I may reduce this also. The yellow tape provides grip to adjust. All clears now. I did consider the Sails etc reversed kicker however. I set the mast vertical, by measurement and set the forestay accordingly. Then I drilled additional holes at the forestay attachment on the mast at 6mm intervals down. See Lester Gilbert's comments on mast building. This gives 1 degree of rake per hole. First sail experience was very encouraging. Perfect balance but a tad twitchy in gusts. This could be more to do with sail settings - must experiment more. Total weight ready to sail is 3795grm so I have 110grms of lead in the bow. A shame to have to put it there but that trims the boat exactly as Brad has drawn. Not as light as my epoxy glass hulls but much much stiffer, which may count for something. Any comments, advice or just critique, welcomed. Richard National championship race costs.xls

-
First sail, well balanced and goes like a train ! Using old rig from my Red Wine to get going.

-
Thanks for your comments James, the solution was indeed easy. I have re positioned the fairleads right in the corner of the foredeck side deck transition. Just wish I had checked before slavishly following the drawing. I already had the lines only 1mm higher than the deck. I have removed the knurled wheel from the Sails etc kicking strap and all is clear now. Point taken about the sheet eyes, probably look a little higher because of the picture angle, but could be lower I agree. Richard
-
Hi Roger, looks stunning really beautiful finish. I achieved practically the same weight. My bulkhead in front of the well gives me nearly 15mm to mast leading edge so I have plenty of room for ram. Picture attached. May be a bit of surgery to your deck for a recess to accept the ram screw. Let me know your solution. My problem is the kicking strap fouling the winch lines emerging from the bulkhead. All as the drawing so I will have to devise a wire kicking strap with the tension screw inside the boom or something. All ready to sail apart from this hiccup ! Richard

-
Hull finished, just requires tidying up and a final thin coat of epoxy, which will be flatted back with 1200 wet and dry. Then setting the trim for ballasting the fin. Note that I have straightened out the centre line of the fore deck. Brad's drawing shows a sharp curve towards the bow. The sheer retains the sharp upturn but the deck would have been tricky in wood and heavier to achieve; requiring intermediate deck frames. The drawing does show these however. Richard